Copyright 1998-1999 R.G. Keen All rights reserved
Tired of changing batteries in your pedals? How about making a single pedalboard power supply that will run all your effects at the same time? OK but not exciting?
All right, how about if it can be adjusted to simulate a real battery, whether fresh and full of Zap! or getting old and tired? Is that interesting?
There are several pedalboard power supplies on the market. They range from dismal unregulated, unfiltered wall-warts to super-regulated, multi-tapped pedalboard supplies, and one commercial unit even allows low or high battery voltage adjustments. It's quite expensive though. You can do your own if you're so inclined.
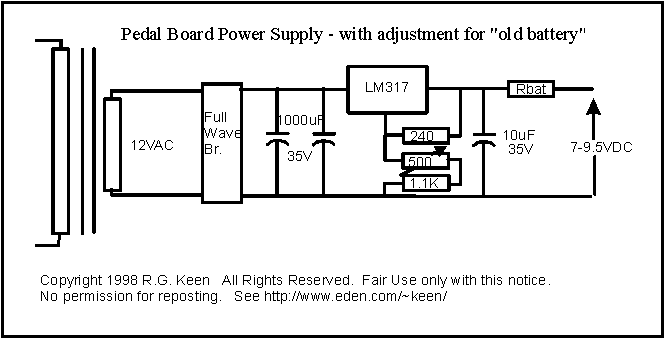
The schematic shows how the thing works. It's not rocket science by any means. The raw power comes from and AC power transformer - and any wall wart with enough voltage and current rating, either AC or DC output, will power it. The raw power comes onto the board and is immediately full wave rectified (that's why raw power can be AC or DC - the FWR homogenizes it into DC) and filtered.
From there, it drops right into the real works - a three terminal regulator. This particular three terminal regular has a difference from most of them, though - it's adjustable. The LM317 is a TO-220 device that can supply over 1A of output current if properly heat-sinked (heat-sunk??) and has an output that can be varied from 1.25V up to about 40V or so by a simple resistance.
The 317's pins are Input, Output and Adjust. It has no ground connection, oddly enough. It adjusts the current it lets through to force the voltage between the output and adjust pins to be 1.25V. The adjust pin is a high impedance pin, so any current coming out of the output pin has to be sunk somewhere else. In actual operation, a resistor of about 125 to 240 ohms is connected between the output and adjust pins, and another resistance connected from adjust to ground.
The 1.25V difference between the output and adjust pin makes 1.25V/240 ohm or about 5ma flow in the 240 ohm resistor, and on through the resistance to ground. The resistance to ground sets the actual output voltage. This resistor can be any value from zero ohms up to about 10K, and the output voltage will become (5ma * Radj) + 1.25V.
For our purposes, we want the output to vary between about 7.0V for a weak, tired old battery and 9.5V for a fresh, tongue-zapping new alkaline. If we go through the math, we need the adjustment resistor to be 1.1K for the low 7 V output and 1.6K for the 9.5V output, so we use a 1.1K resistor in series with a 500 ohm pot. The pot setting now varies the output between the two voltages. There's an output capacitor of about 10uF on the power output just to keep things stable. Don't leave that out.
There's another part in the schematic - Rbat. What's that?
The other difference between new and old batteries is that while new batteries can put out a lot of current, old ones can't - they develop a high internal resistance. If we put a real resistor on the output of our regulator, it will fake the internal resistance of the battery.
Rbat is something you pick by experience and ear. New batteries have internal resistances in the range of a few ohms up to maybe a couple of hundred ohms for a really sucked-dry carbon-zinc one. Ideally, Rbat should vary smoothly with the voltage adjustment so that at the highest voltage, Rbat is lowest, and when the voltage is lowest, Rbat is highest. You could accomplish that with a dual gang pot with 500 ohms on one of the sections and 100 or 150 ohms on the other section. Since these are rarer than hen's teeth, you have two options - either just use two independent controls, or make up your own multisection pot with the techniques outlined in The Secret Life of Pots. If you did that, the single knob could just be labled "Battery Age" and vary from 9.5V/0 ohms at the counterclockwise extreme to 7.0V/100 ohms on the clockwise extreme.
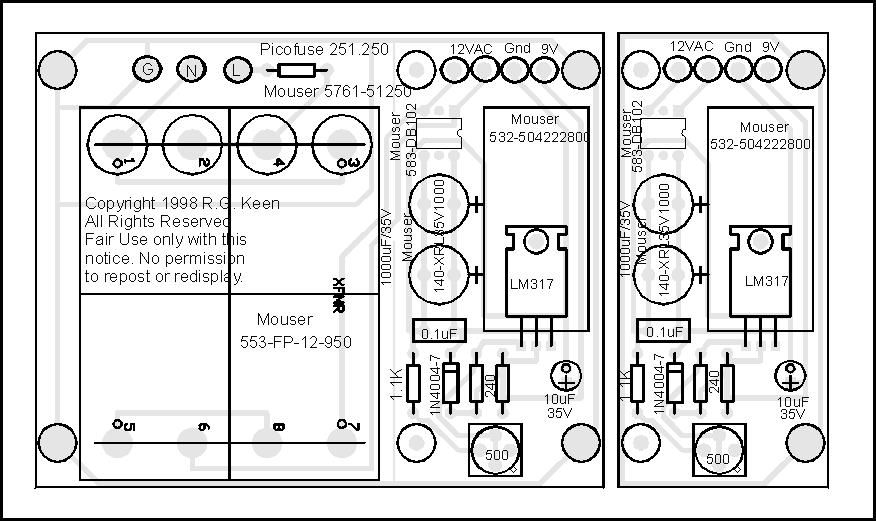
About the circuit board
This circuit board shows the whole mess, plus parts identification. This circuit board layout reflects a simple transformer/rectifier/filter/regulator with the adjustment mods.
The board is designed with flexibility in mind. As it sits, the board accepts a 12VAC/1A flatpack transformer and has enough filtering and heatsinking to put out 1/2 A or so of very clean 9V power. If you prefer to use an external wall wart to run this regulator, you can also run just the filter/regulator section from an external wart which needs to put out 12 - 14V AC or DC. Just cut the board off at the innermost edge of the power transformer outline, and use the inboard pads to bring power in on wires.
Since it uses 120VAC power, you must be immaculately careful about the primary wiring; be certain that you know how to wire this up safely, or DO NOT ATTEMPT IT.
The board as laid out will fit inside a Hammond 1590BB cast aluminum box.