 I heard some
questions about how you'd get a selectable phase reverser - a circuit that would
go from a gain of +1 to a gain of -1 with the flip of a switch. The
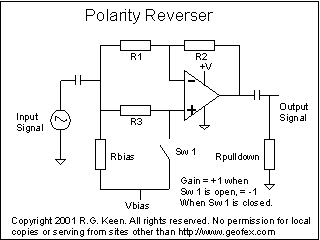
circuit at left does this, and more.
I heard some
questions about how you'd get a selectable phase reverser - a circuit that would
go from a gain of +1 to a gain of -1 with the flip of a switch. The
circuit at left does this, and more.Copyright 2001 R.G. Keen. All rights reserved. No permission for local copies or serving from sites other than http://www.geofex.com.
 I heard some
questions about how you'd get a selectable phase reverser - a circuit that would
go from a gain of +1 to a gain of -1 with the flip of a switch. The
circuit at left does this, and more.
To understand how it works, assume that Vbias is somewhere in the middle between +V and ground. The inputs and outputs are AC coupled through their respective capacitors, so the DC voltage on the + input of the opamp, and therefore the - input and output, is set by the resistor Rbias to the Vbias supply. The AC input signal is applied to both the + and - inputs through R3 and R1 respectively.
If Sw1 is open, then the input signal drives the + input through R3. The input resistance of the opamp is theoretically much greater than R3, so the + input gets the full signal voltage. The - input sees the signal through R1. This forms a classical inverting amplifier circuit. If R1=R2, the gain for the negative-input side from input to output is -1. The gain from the + input is 1+R2/R1, or 2, so the + input tries to drive the output to a signal that's in phase with the input, but twice as big.
It works out that for linear circuits, with multiple inputs, you can consider each input's contribution as if there were no other inputs, and then add them up (This is called the superposition theorm). So we can figure out what the output is by adding the +2 times the input signal to the -1 times the input signal and get a +1 times the input signal. This is in fact what happens when you breadboard the circuit (at least, within the tolerance of the parts used).
If we close switch Sw1, we effectively prevent any signal voltage from reaching the + input. This means the output is 0 -1 times the input, or just -1 times the input - it's now an inverter.
There are lots of uses for this thing. The simplest is to invert the phase of a pedal that somehow didn't see clear to do the right thing and not invert the signal. It can make up for wrong phasing on speakers.
There are other uses.
 Let's look at
what happens if you flip the switch on the fly.
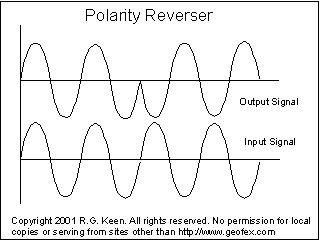
In the picture imagine that switch Sw1 is open for two full cycles of the input signal, then closes. The output will follow the input, then instantly (as fast as the opamp can slew!) change to an inverted version of the input signal.
It's not all neat and tidy like this. Notice that I did the easy thing to draw and chose to have the polarity switch flip right at a zero crossing. If the switch flips at any other time, there will be a transient as the opamp slews toward the opposite polarity.
We can put this to good use, though, as we'll see later.
 One application
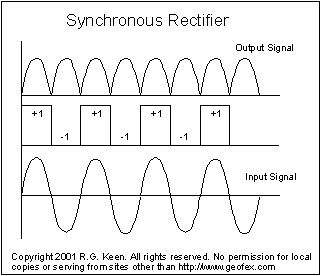
of the polarity reverser is a synchronous rectifier. As shown at left, if
we derive a switch signal from the incoming signal itself so that the switch
flips to the +1 position whenever the input signal is positive and to the -1
signal when the signal is negative, we get a full wave rectifier. The signal
itself tells the polarity reverser when to flip. This is a technique that is
used in some power generation facilities and in special instrumentation
techniques.
Clearly, we could do an octave-up pedal if we got the circuit right to do this.
 We can even go
further. If you do the math on the synchronous rectifier, you find that the full
wave rectified result of the operation is the same as if you'd multiplied the
input signal by a +1/-1 square wave. This is what a ring modulator does. In the
synchronous case, the product of the frequency of the square wave and the signal
is the product of the signal frequency and the square wave frequency, which to a
first approximation is the sum and difference of the two. Since the frequencies
are the same, the sum is two times the base frequency, which we see as the
octave up, the difference of the two, which we see as the DC offset, and the
assorted higher frequencies which are the products of the sine wave times the
other harmonics in the square wave.
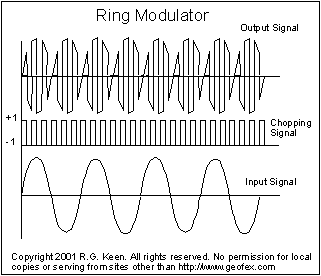
The square wave driving the switch doesn't have to be the same frequency as the input signal, of course. If we have a square wave that's higher than the signal, we get the ring modulator signals as shown at left. This is pretty much exactly what you get out of any chopper-style ring modulator.
There's a lot of practical work to do to make this into a usable circuit, of course. The clock signal has to have very little bleed through, and that's tricky.
In a later installment, I'll go through some circuits and additional applications like using a similar circuit in a tremolo application.