Copyright 1997-1999 R.G. Keen. All rights reserved.
The technique of marblizing has been around for several hundred years. The most common use for the last couple of centuries has been to make those swirl-patterned endpages inside the covers of the better grade of hardbound books. It can be applied to almost any object that can be dipped into a floating paint bath.
Classical marblizing is reasonably demanding to get a good pattern reliably transferred to an object. There are books on this at crafts stores. Just decorating objects with neato swirled patterns of paint is considerably easier, you just have to accept a lower standard of knowing ahead of time how it will come out. The patterns using the easier methods are likely to result in no clearly recognizable pattern (at least intentionally), although they may well be breathtaking beautiful (especially if YOU are the artistic genius that made them :-).
There are two ways to make swirl painted objects, Dip and Drip. Drip is the least complicated, and least predictable. You take thinned paint of various colors and drip it on the object, allowing gravity, viscosity and surface tension to combine the paints at some places, separate them at others. You can control the patterning to a small extent by moving the object around to let gravity pull the runny paint into patterns, but too much of this and the colors mix a lot and the swirl patterning is lost. Done with a good touch (or some practice!) this can turn out very interesting patterns.
Dip is much more like classical marblizing. In it's simplest form, you take a bucket of water, drop paint onto the surface in some pattern, manipulate the pattern with feathers, popsicle sticks, fingers, etc. until you get the pattern you like, then dip the prepared object through the paint film. The paint film on the water will prefer to stick to the object, and will coat it with the pattern.
In actual practice, the Dip method allows you to exert more control over the pattern as you put increasing amounts of work into stabilizing the conditions. The water should really be thickened into a gell to hold a pattern more easily; the paints should be mixed specially to flow just enough; the temperature should be just right. I encourage you to look into the craft of marbleizing if you find you like making more formal patterns. I received enough self gratification with just neat-o swirl patterns to stop with paint films in a bucket.
Detailed Drip Process.
In my best Ricky Ricardo imitation - "Hokay, boyzz and gerrls, we gone to get messy!"
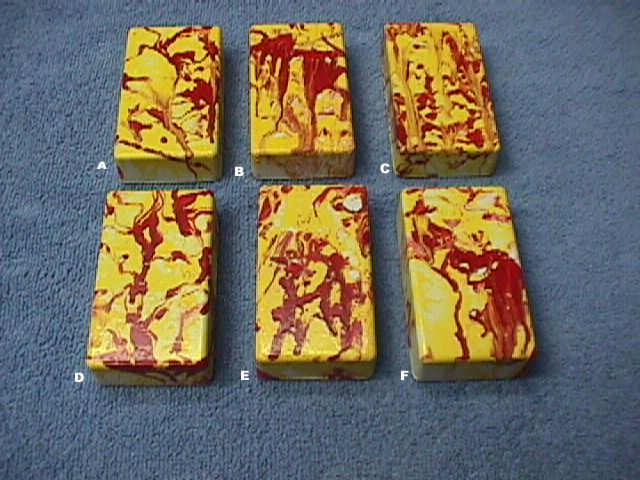
Prepare the object (in my case a cast aluminum box) for painting. - How are you going to hold onto and manipulate this thing while you paint it? The purely manual method - fingers - has some drawbacks. I use pieces of wire cut from old wire coat-hangers attached to my boxes by screwing the backs down on the coat-hanger wires to form handles to do this. Figure out your own technique before you start painting. Invention is usually required.
When it's beautiful enough, and the dripping off the bottom has abated somewhat, place it where it won't be disturbed until the paint at least gels some and you can force dry it, or until it is fully air-dry. You'll want to support it in some way by the manipulation handle so that gravity does not foul up your pattern while it dries. I like to air dry it to the gel, non runny stage, then stick it into the toaster oven for an hour or so at 200F, but the actual time and temperature will vary with the paint.
Note that the actual objects that get painted by either the dip or drip process can be any object that you can mechanically handle painting and drying. The Fender Custom shop produced some swirl painted Strat bodies - our local used-musical-stuff store has one of these. Whole automobiles are probably a stretch of the dip technique, though.
Detailed Dip Process
This will be water AND paint messy. I hope you've been hoarding old newspapers.
When you're done, pour the water through a coffee filter to get those floating globules captured, and discard the (beautifully colored) soiled newspaper.
An important part of any swirl painting session is the appreciation of the patterns you've formed. Don't be afraid to stop and just look.