|
Several people have asked for a remote effects switching system simpler than the Programmable FX Switcher. All they want is to just be able to bypass effects individually on a one-by-one basis. While the Programmable FX Switcher can do this, it's needless complicated for the task. There ought to be a simpler way, and there is.
The switch shown inside the dotted box is a double pole double throw (DPDT) stomp switch wired up to connect the guitar jack to the amp jack when thrown one direction, and guitar to FXinput, amp to FX output when thrown the other direction. So far, this is pretty basic. What we want to do is to make the switch flip remotely, not by stomping on the actuator on the actual switching element.
Relays have two sets of ratings - the coil and the contacts. Contact ratings make sure that the contacts are properly matched to the signals they'll be carrying. For instance, you *don't* want a relay rated for 10A of 120Vac in this application. The metallurgy and physical makeup of the contacts for such a high power switch will lead it to be incompatible with the small signals we want to switch. Relays rated for "low signal" or "telecom applications" should be good in this application. The coil rating tells us how much voltage and current the relay needs to operate. Every relay's coil is literally a coil of copper wire. As such it has some resistance and some inductance. The resistance is such that with the correct voltage applied to the coil, an amount of current sufficient to operate the relay is passed by the coil. Too little current in the coil and the contacts won't touch. Too much and the coil will burn up. For FX switching, we want as little power eaten by the coil as we can get by with, and good contacts for what the relay industry calls "dry circuits" - not much voltage or current.
Also, we'd like to defeat one of the ugly habits of relays - induced clicking. Even though there is no physical connection between the coil of the relay and the signal switching contacts, there is always a little bit of capacitance between any two conductors. This is true inside the relay. There is a tiny capacitance, maybe a fraction of a pico-farad coupling the coil and the signal lines. This wouldn't normally be as much of a problem, except that changing voltages on inductors cause some very fast, sharp edged transients, especially when the current in the inductor is turned off. These fast edges can couple through the tiny parasitic capacitances and cause audible clicks in the signal path. The neat way to defeat the clicks is to slow down the change in voltage across the inductor. The circuit at left does that. An on/off signal is applied to a resistor/diode/capacitor network on the base of a common 2N3904 transistor. The capacitor to ground slows the on/off transition down on the rising (turn on) edge of the input signal, and the diode lets it turn off fairly quickly. The capacitor between the collector and base of the transistor causes the transistor to turn off slowly. Taken together, the speed with which the voltage across the coil inductance can change is slowed down. Tiny parasitic capacitors can't couple slow signals very well, and any transients are vastly reduced. In addition, the driver circuit turns on a local indicator LED whenever the coil voltage is on. The +On/-Off signal can be low power, is completely isolated from the signal lines, and can more easily be placed remotely.
Loop 2 then independently either passes the signal through the effect on its two FX jacks or passes it straight through to the Amp jack. The signal flow is indicated by the arrows. With this set up, any time Loop 1's +On/-Off signal is high, the effect on Loop 1 is engaged and the Loop 1 LED is on. Likewise with Loop 2. Obviously, we could keep stringing these things together, as many as we like. The wiring on the FX input and FX output jacks is worth noting. The jacks are "normalized" together. That is, if there is no plug in either jack, the signals are always passed from one to the other by the normally closed switch contact. This means that if you have no effect at all plugged into a loop, it's always "bypassed", and you never have a complete signal dropout.
At left, I've shown two on/off circuits suitable for driving the circuit above. To get more effects loops, you just add more of the remote switched relay bypass circuit and more of the indicating remote control buttons. A good number to shoot for might be six loops. Making that would require the indicating remote to use three CD4013's and two CD40106's (or CD4584's), with six pushbuttons, six LED's, etc. At this point, the electrical design of the whole mess is pretty much done. There are only two different electrical circuits that do everything we want. All that remains is to put enough of them down together to do all the switching that is needed; they're all completely independent, so we can just make as many as we like. The *ergonomic* design isn't done though, nor is the rest of the physical design. That stuff can be even more important than the electrical design. This has to be usable or it won't get used. Let's do a first design with six loops, as that number is large enough to be useful, but a tidy multiple of the number of chips that get used. Loop Switching Box Design This box has to contain:
Remote Indicating Switch Box Design The normal way to do this is with a metal box on the floor and foot switches. However, I've had a request for a guitar mounted one, and so let's look at that first. The box has to contain:
To mount this on a guitar, miniaturization is paramount. Fortunately, this is where the huge rush of miniaturization will do us some good. The switches can be miniature tactile pushbuttons. Mouser has some that even have integral indicator LEDs. These are expensive ($3.99 each) but would make for a really tidy setup. You can do much the same thing with miniature tactile switches (about $0.25 each) and regular LEDs. To get this really small, we can use surface mount CMOS chips and other parts to get the size down to something you could velcro to a guitar. Cable Design Designing the cable to connect things turns out to be important for something that connects to your guitar. You have to have a cable that's small enough to be attached along with your signal cable for this to be practical. A switching system like the one we have proposed here requires one (or preferably more) ground wires, one (again, or more) power wires, and six signal lines, total of eight wires.
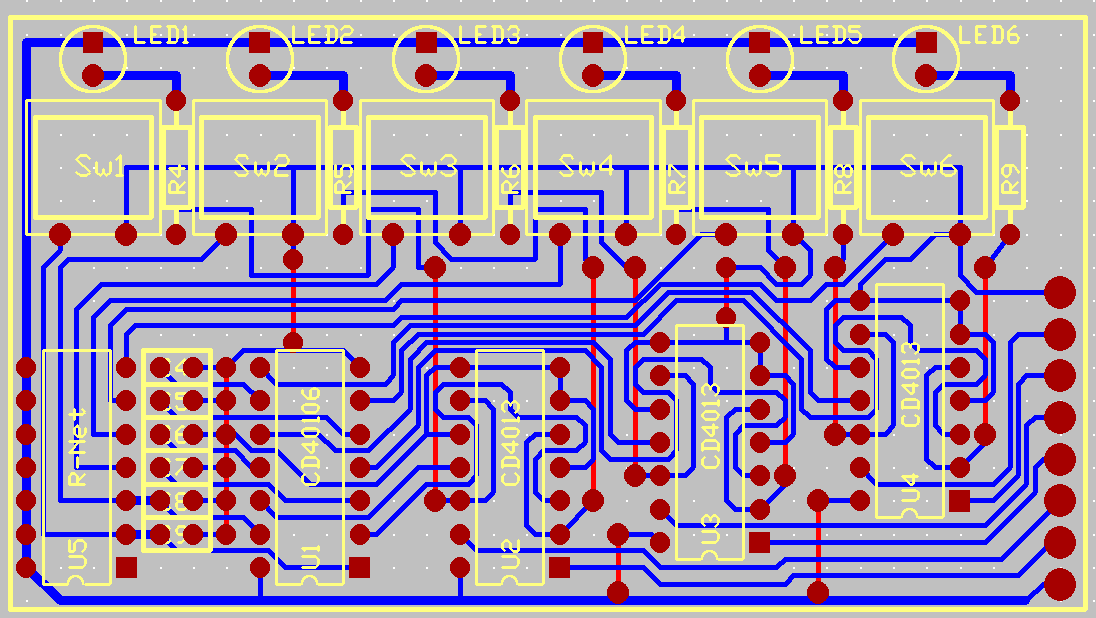
It's clear that you want a thin, flexible cable with lots of conductors. What may not be so obvious is that you should want a connecting cable that is easy to buy commercially so that you don't have to spend some quality time with a soldering iron or crimping tool when you last cable bites the dust. It's really, really handy to get a cable that you can just drop into a store and buy. Fortunately, multi-conductor cables and connectors are available cheaply and easily in today's computer world. Taking a quick look at the bible according to Mouser, we find a couple of alternatives. The smallest, simplest and lightest is the RJ-11 family of data connectors. These things are the big brothers of the common telephone jack. They come in sizes of two to eight conductors and better yet, you can buy "Category 5" data cables in a variety of lengths. If you like, you can also make your own Cat 5 cables as long as you like. Second choice is probably the Mini-DIN connector. These come in sizes up to nine contacts, but you'll have to make your own cables. If you go this way, always make (and test!) two cables so you have a ready spare. Third and higher choices are is of a number of multi-pin rectangular and circular connectors that are bigger, clumsier, and that require delicate soldering or special crimping tools. Ugh! Here's a first draft PCB for a guitar mounted pushbutton board for six indicating pushbuttons:
R-Net is a resistor network, Mouser 71-MDP1403-330k ($0.56), C4-C9 are 0.01uF, Mouser 80-C315C103M1U ($0.012 each). Sw1... Sw6 are Mouser 633-JB15FP ($1.40 each). The board is about 1.8" by 3.2", and includes all the logic for converting switch-presses to on/off signals suitable for controlling the remote bypass box. It might be possible to make it smaller with SMD components, but the switches and LEDs will set the length anyway. Pin-in-hole construction will be easier to do. If I were making this board up for guitar mounting, I'd get it all running and tested, then form paraffin wax all over the switches and LEDs to keep them from being covered, then cover the rest in a nice block of black epoxy. Once the epoxy set, I'd peel off the wax. The resulting unit should be workable. It would stick to the surface of a guitar with velcro nicely. Another version with just the switches on the guitar might look like this:
All of the logic to debounce the switches and set relay control flipflops would then be back inside the remote switching box.
PCB for the remote switch box
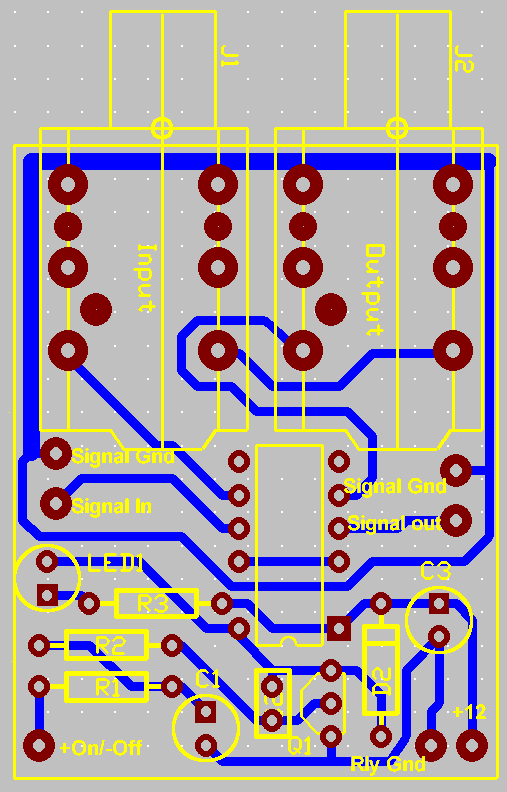
So I did this. The PCB is for one FX send/receive pair of jacks. It's the circuit I first showed as a "Remote Switched Relay Bypass with LED"; the same circuit is shown as merely a rectangular block in the later schematics. You can make as many of these as you have time, patience, and money for. Each one gives you one send/receive FX loop that is bypassed by the relay the board carries. You'll notice that there's no provision for mounting hardware on the glass/epoxy board. That's because the two jacks are soldered to the PCB, and are intended to be mounted to the box this thing goes into. The board is small enough to simply be mounted by the two jacks. All of the mechanical stress is from the jacks to the box, none on the board, so this should be reliable. The jacks are Rean slim jack sockets, Mouser number 550-10284 (mono) or 550-20311 (stereo as shown), about $1.00 each with matching nut.
Parts List for Remote Switching Relay Bypass with LED
Still to come... packaging into a system.
|
|||||||||||||||||||||||||||||||||||||||||||||||||||||||
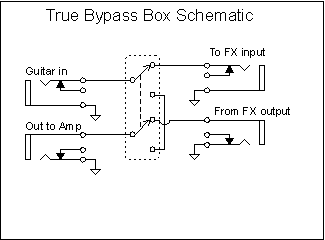 Let's
just build this one up as we go. On the right, I've drawn the schematic of a
"true bypass box". All this thing does is to add true bypass to
anything you plug into the two FX jacks. As shown, you plug the guitar into the
"guitar in" jack, the amp into the "out to amp" jack, and
the effect into the FX input and FX output jacks.
Let's
just build this one up as we go. On the right, I've drawn the schematic of a
"true bypass box". All this thing does is to add true bypass to
anything you plug into the two FX jacks. As shown, you plug the guitar into the
"guitar in" jack, the amp into the "out to amp" jack, and
the effect into the FX input and FX output jacks.  To do
this, we exchange the stomp switch for a DPDT relay. The switch arrangement that
carries the signal is completely unchanged, but now the switching action is done
by an electrical current running through the relay coil instead of a plunger
moving the switch mechanically. Whenever we close the switch to ground at the
bottom, current from +V flows through the coil and pulls the relay to the other
position. If we want, we can put that switch to ground a ....long... way away
from the relay. The signal can stay there, all protected from hum and
interference, and the switch that makes things happen can be far away.
To do
this, we exchange the stomp switch for a DPDT relay. The switch arrangement that
carries the signal is completely unchanged, but now the switching action is done
by an electrical current running through the relay coil instead of a plunger
moving the switch mechanically. Whenever we close the switch to ground at the
bottom, current from +V flows through the coil and pulls the relay to the other
position. If we want, we can put that switch to ground a ....long... way away
from the relay. The signal can stay there, all protected from hum and
interference, and the switch that makes things happen can be far away. 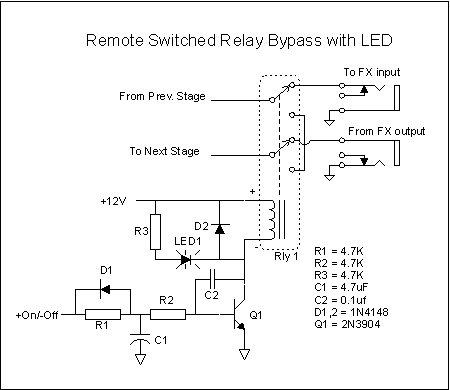 Although
running wires to the coils of the relays to some remote set of switches does
work, it would be nice to add some "user friendliness" to this thing.
It's always good to have an indicator of what's on and what's off, so we'd
probably like to have an indicator LED on both the local bypass box and on the
remote switch box.
Although
running wires to the coils of the relays to some remote set of switches does
work, it would be nice to add some "user friendliness" to this thing.
It's always good to have an indicator of what's on and what's off, so we'd
probably like to have an indicator LED on both the local bypass box and on the
remote switch box. 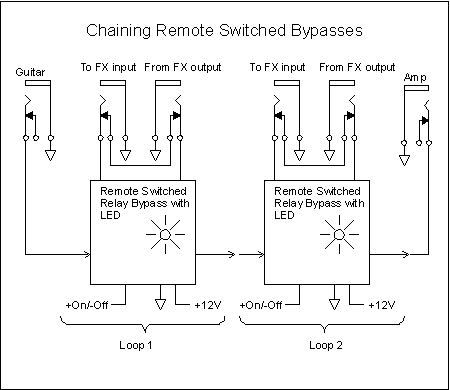 If we
take two of the entire circuits from the last picture and hook them in series,
we'd get something like the picture at left. A guitar signal comes in the input
jack and goes to the Loop1 switching setup. Depending on the voltage on the
first +On/-Off signal, the guitar signal is either passed through the effect
connected to Loop 1's FX input and FX Output or passed straight through... to
Loop 2.
If we
take two of the entire circuits from the last picture and hook them in series,
we'd get something like the picture at left. A guitar signal comes in the input
jack and goes to the Loop1 switching setup. Depending on the voltage on the
first +On/-Off signal, the guitar signal is either passed through the effect
connected to Loop 1's FX input and FX Output or passed straight through... to
Loop 2.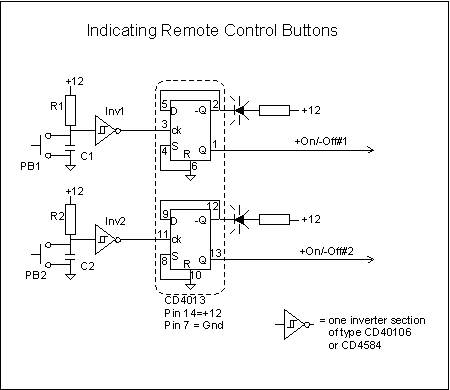 To
generate the remote switching signals, we need some way to switch the on/off
lines between +V and ground. This could be simply a SPDT switch controlling the
signal line and an indicator LED, but it would be cheaper and more flexible to
use momentary switches for the footswitches and then CMOS logic chips to do the
signal generation.
To
generate the remote switching signals, we need some way to switch the on/off
lines between +V and ground. This could be simply a SPDT switch controlling the
signal line and an indicator LED, but it would be cheaper and more flexible to
use momentary switches for the footswitches and then CMOS logic chips to do the
signal generation.

 Here's
a possible layout for the relay switches. I could have done a single board with
several pairs of input jacks, but it occurred to me that it would be good to
make it modular - you can add as many effects loop send/receive pairs as you
like.
Here's
a possible layout for the relay switches. I could have done a single board with
several pairs of input jacks, but it occurred to me that it would be good to
make it modular - you can add as many effects loop send/receive pairs as you
like.