Copyright 2000 R.G. Keen. All rights reserved. No permission for posting from web sites other than http://www.geofex.com.
|
|
Have a bunch of effects? Want to get arrange them more flexibly and get to neato arrangements on the fly? Here's a way to do that. You can probably build it yourself for a modest outlay of money and time. Best of all, it's a metal-contact, true bypass, non-MIDI, no-computer-science-degree-needed thing. If you want a more computer oriented. programmable, MIDI controllable thing, I'm designing one of those as well. Look at the SpiderFx.
This thing can look complicated, so we'll start slow and home in on it. In the beginning, we figure out how to select between two different effects.
Switching Lessons - how the switcher selects any FX, any order
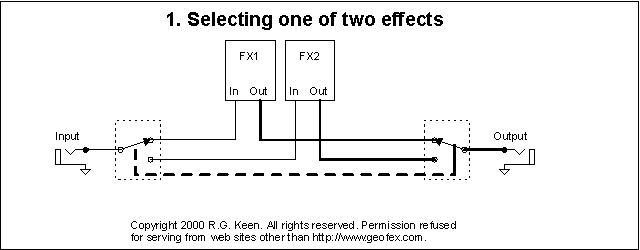
How to select one of two effects:
Pretty simple - route the signal from an input jack to a selector switch, each contact of which is connected to the input of one of several effects. The switch is actually one of our friends, the DPDT switch, and the second effect is connected like the first one. Operating the switch picks whether the input is routed to the input of FX1 or FX2, and the output of FX1 or FX2 is sent to the output jack. This is actually the same as one of the true bypass arrangements, but with FX2 substituted for the bypass path. We'll see more about that later. Note - the dotted line between switches indicates that both switches operate at the same time - they're mechanically linked.
More than two:
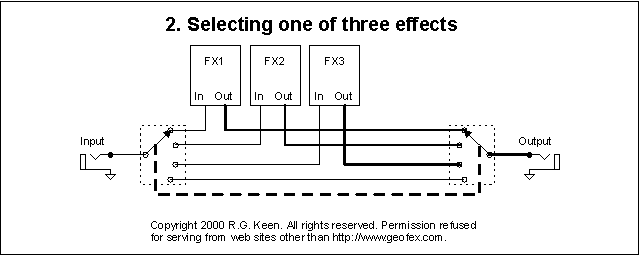
We can add a third switch and a bypass path if we go to a more complicated switch. This schematic shows a one-of-three FX selector, and includes a true bypass path. The true bypass path is conceptually just a wire that could be broken in the middle and the input half wired to the input of a fourth effect, the output side wired to the output of the fourth effect - so we see that in the general case, a bypass path is just a special case of another effect loop. The switch is now a 2P4T selector switch.
But this just selects one of four FX. How can we get different orders of the effects?
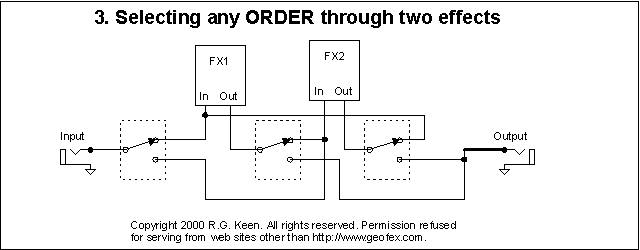
We can rearrange the switching and be a little clever. To pick any path through two effects, we can use a SPDT switch at the "output" of the input jack and each FX. As shown below, the input jack can go to either the input of FX 1 or FX2. The output of FX 1 can be connected to either the output jack, or to the input of FX 2. The output of FX 2 can be connected to either the input of FX1 or the output jack. If all the switches are independent SPDT switches, you can get some ugly combinations - like the input jack connected to FX 1 input, FX1 output connected to the input of FX2, and the output of FX2 connected to the input of FX1, and the input jack. This "disallowed" combination will probably oscillate, and certainly wouldn't sound good if you could hear it - which you can't because nothing is connected to the output jack. However, if you're careful and only choose combinations that go through the path Input -> FX1->FX2->Output or Input->FX2->FX1->Output, the thing works. This particular special case can be automated with DPDT's, and if you eliminate redundant paths and simplify the switching, it is in fact the same as the switching setup for the Juggler FX order reverser.
But let's look at how we'd do more than two FX with any path through them. To do this, we just put a selector switch on the output of each FX and the input jack. The input jack can be switched to any one of the three effects or through a wire to the output jack. FX1's output can be switched to either FX2, FX3 or the output jack. For consistency's sake, the #1 switch position on FX1's selector switch could have been connected to its own input, but that would be one of those disallowed connections. We choose to leave that wire off so that if it's done, it is at least harmless. We do that on each output selector; so the FX2 output can't be connected to FX2 input, and FX3 can't be connected to FX3 input.
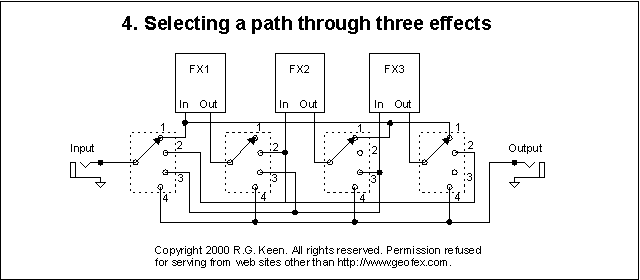
With this setup, we can start at the input jack and go through FX1 to the input of FX2, to the input of FX3 and on to the output jack. We can also do input -> FX3->FX1->FX2->output, as well as input to FX3 to FX2 to output jack (not using FX1 at all!) and any other order. You should look at the setup and satisfy yourself that any possible order can be obtained (it can!) Some combinations have to be avoided; any combination is disallowed if it has (a) more than one connection to an effect input (b) a connection of an FX output to its own input (c) no connection to the output jack - at least *one* of them has to go out! But the process of setting up a path is simple. Start at the input jack. Set the input jack to the position for the first FX in line. Then go to that FX, and set its selector switch to the next FX in line, and continue until you get to the output jack. You can leave FX out; any path with one or more effects in it in any order that doesn't violate (a), (b), or (c) works fine.
OK, that's great. Any FX order. But how do I do multiple "paths" and select them? The next figure shows how.
As you can see, we put a 4PST switch in, P1A... P1D (for "program1A through program 1D"). All the contacts on the P1 switch open and close together. We then duplicate the "path" switches, to make another row of selector switches for each FX and a new P2A...P2D. When P1A...P1D are closed and P2A...P2D are open, the "path" is through the P1 selector switches on each FX. When P2A...P2D are closed and P1A...P1D are open, the signal follows the path through the P2 selector switches.
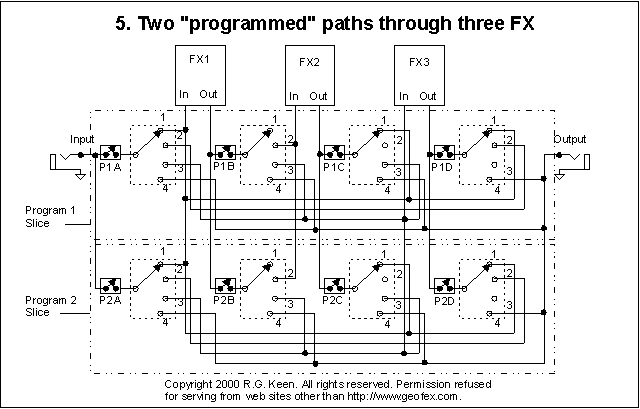
Notice that the P2 path and selector switches are identical to the P1 path and selectors. We can therefore make as many programs as we like by just making another program "slice" and connecting it up to the inputs and outputs of the FX and the input and output jacks. In practice, we will make the P1A...P1D program switches be one or more relays all turned on at once when the program is selected electronically. This is the thing that lets us select a program remotely.
Also notice that there is a vertical slice we could have taken which includes one FX with its selector switch and programming switch. The design is modular - you can enlarge it to as many FX and programs as you like.
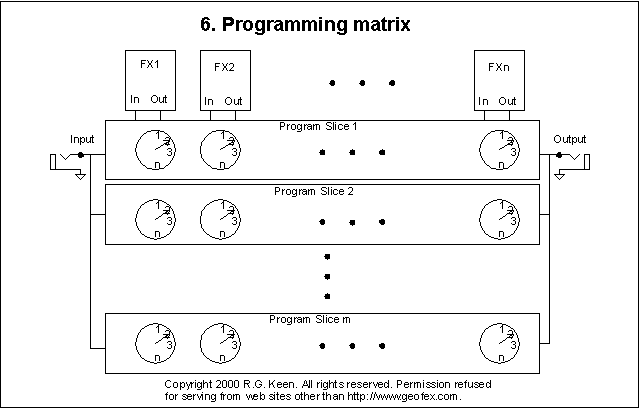
So how big is that?
The question of how much is enough is tough. Obviously, the more the merrier, but we have to remember that there is a price in terms of complexity as well as parts and labor for all this. One and two-effect setups probably don't need an order switcher, and a three effect one is marginally justified unless the "FX" are really a series string of more than one effect; in that case, the FX switcher would probably function as just a selector for one of the strings at a time, which it can easily do. From four to six or seven effects is probably the reasonable range. The number of possible orders/programs goes up proportionately with the number of permutations and combinations of the number of FX, so the number of *possible* programs is proportional to N factorial for N FX. This gets out of hand rapidly. For instance, for 6 FX, six factorial is 720 possible "programs". Probably most people can't remember what more than half a dozen programs do well enough to punch them in on the fly, so something like six or seven programs seems like a max. So I would expect most implementations of this thing to be maybe 4-6 FX and also 4-6 programs.
That means we need somewhere between 16 (for four FX loops and 4 programs) and 36 (for six FX loops and six programs) selector switches. We'll assume that we'll always want one true bypass path that will never have an effect loop in it, so one "program" that will be selectable will just activate a single relay connecting the input jack to the output jack (deactivating all the others, of course - that's in the footswitch logic, which follows.)
Let's take a look at some of the practical aspects of building one of these.
First, you have to make some choices, and given the sheer number of parts in this thing, those choices have an economic impact. The two critical ones are what switches to buy for the routing switches per FX and what program switches to buy for the program slices. The selector switches are most easily idealized as a 1PnT rotary switch, where n is the number of FX you have. Luckily, there are a couple of good choices for that switch.
Mouser Electronics has a rotary switch that is suitable that comes in 2P6T and 1P12 position varieties for $1.51 each. This would work just fine for the selectors. A programming slice would cost you n times $1.51 for selector switches. You can also go very cheap, and use dual row programming pins. These things are the gold square pins on 0.10" centers commonly used for configuring computer hardware. However, if you solder a wire to all of the pins on one row, a jumper now will connect that row to any one of the pins in the second row, so moving the jumper makes for a selector switch. The cost for these is about $1.20 for a 40-position dual row strip that can be broken into six six-position selector units, so it's very cheap indeed for selector switches. Intermediate in cost is something like DIP switches. These things can be set up as a selector switch and cost about $0.80 to $1.20 each. You do have to remember not to turn on more than one of the switches per selector, though, so the actual use gets a little more complicated.
The programming switches are more problematic. You can use common DPDT dip relays here and just use one relay for every two FX loops. Since all the relays in one program slice are activated simultaneously, you can just parallel up relays. You could also use SPST, SPDT, or multipole relays for this. There are 6PDT and 8PDT relays, but they tend to be quite expensive, maybe $15 each. I found a surplus telephone switching board with 128 5V SPST reed relays on it. For mine, I'm going to use the reeds.
The key to building one of these on the cheap is surplus parts. See if you can find rotary switches and/or relays cheaply. The requirements are modest - the rotary switches just need at least one pole and as many throws as you have FX loops. More poles and selections than you need are OK - just ignore them. You can use one or a combination of relays to do the selector switches. In fact, if you're willing to accept a little silicon in the signal path, you can also use CMOS switches for the selector switches and save a bundle of bucks, because CMOS switches are four for $0.50 in the CD4066. CMOS switches will require that you have power for the CMOS switches, and that you bias them at the middle of their power supply for no-click operations - still cheap as this is two capacitors and one resistor per CMOS switch.
Building the footswitching section.
This turns out to be a breeze. CMOS logic is the musical hacker's best friend for switching tasks like this, and it comes in incredibly handy for this one.
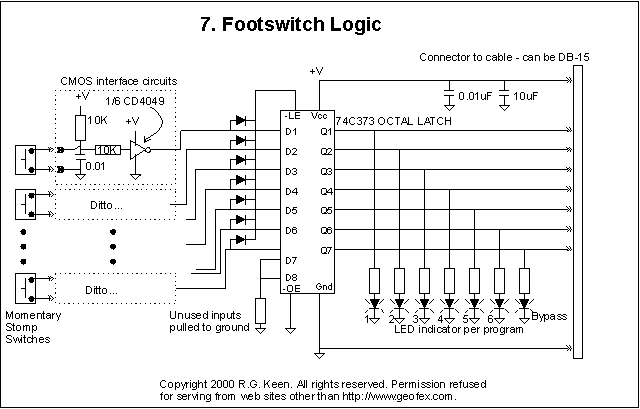
The 74C373 Octal Latch turns out to be ideal. It latches eight bits of data, and can be rigged to latch one and only one of them at a time. In the circuit shown, momentary footswitches short the 0.01uF capacitor to ground in the CMOS interface circuit. The capacitor is normally pulled up to +V by the 10K resistor. This low level on the input of the CD4049 inverter section causes the output to go normally high. We could actually use the momentary footswitches to momentarily connect the inputs to the 74C373 to V+, but doing it this way provides a lot more immunity to static discharge and other things that could damage the CMOS logic.
The positive output of the interface circuit whose footswitch was pressed pulls the corresponding data input (D1...D8) high, and through the array of diodes also pulls the -LE signal high. When -LE is low, the Q1...Q8 outputs hold the last data latched into them. When LE is high, the Q1...Q8 outputs follow whatever signal is on their corresponding D1...D8 input. When the interface circuit pulls one Dx high, -LE also goes high, and all of the Q1...Q8 are set to whatever is on D1...D8 - only one of which is high. When -LE drops, this high state remains only on the Qx corresponding to the footswitch pressed. The array of resistors and LEDs show which Qx is high. The whole set of program signals goes to the cable connector for connection to the main switch unit. The cable connector also supplies +V and ground connections to power the footswitch unit from the main switch unit. If you use a standard DB15 connector at both the footswitch unit and the main switch box end, the cable can be a standard computer unit, which is very cheap compared to similar audio cables. A twenty five foot cable can be bought for under $10. No audio goes over this cable, so there is no chance of interference.
The footswitch unit therefore selects one and only one of the possible programs. We can use the output signals directly to select which program is to be activated. All we have to do is buffer the program signal so it can drive the rather high (by music and CMOS logic standards) power load of the relay coils that do the program selection.
Relay Drivers
Having the program signals from the footswitch unit, we need to actually operate the relays to change the signal paths. This is just a matter of taking the positive going PGn signals from the footswitch unit and driving the relay coils. There are a large number of ways to do this. One is shown below.
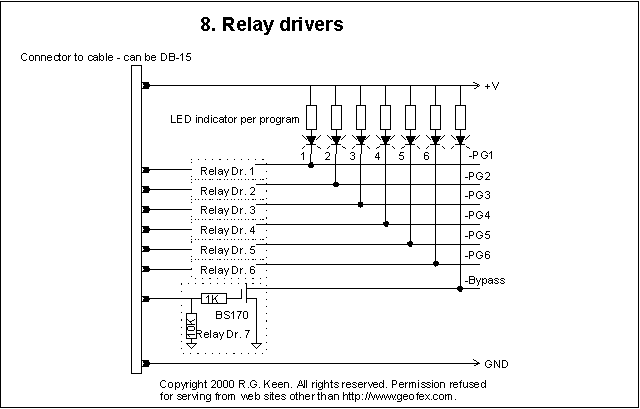
The PGn signal drives the gate of a medium power switching MOSFET. The MOSFET then pulls down on on an indicator LED to show which program is active, and on the relay coil(s) that work the program slice. Another way to do this is with an integrated CMOS-to-relay driver like the ULN2003. The ULN2003 is a single chip seven-driver device that is specifically designed to convert CMOS logic to electromechanical drive levels. It's a little hard to find, although still in production, so I wanted to show both methods. The only requirement is that the relay driver convert the logic swing of the CMOS outputs from the footswitch to a high current drive for the relays.
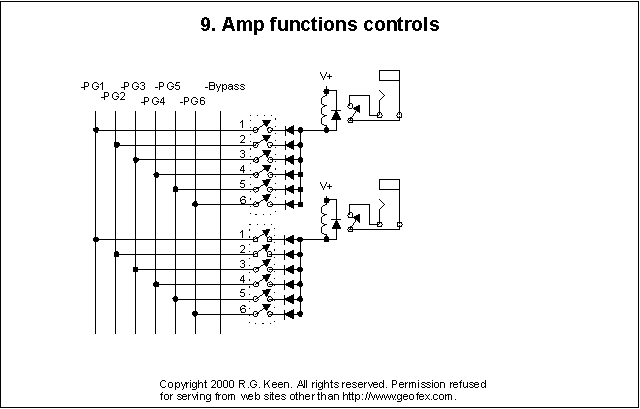
Control of amp functions
After the relay drivers, we have a -PGn signal for each program switch. We simply insert a one-or-more switching arrangement like a DIP switch or discrete toggle switches between the -PGn signals and a diode to the coil of - yep, another relay. The diodes prevent the -PGn signals from interfering with one another, and wherever a selector switch is set, the amp control relay is activated. Most amps require a simple switch closure to ground to activate things like reverb, tremolo, and channel switching. You are free to make as many external/amp control relays as you like. Since they are completely isolated from both the audio path and from the switching logic, they don't interfere with anything else.
Building methods
Each FX loop needs one relay contact and one output path selector switch per program. If you build a four-FX, five program switcher, you'll need twenty selector switches and twenty relay contacts. The relay contacts should be groupable so they can be activated in groups of five at a time, as you have to turn on five contacts to activate one program-slice. They can be five single contact relays, three DPDT DIP relays (the sixth contact is unused), two DPDT's and a single one 6PDT, and so on as long as you can get five contacts to make at once. The whole name of the game is getting this largish number of switches and relays at a price you can afford.
The cheap way uses dual-row programming terminals for the selector switches and CMOS analog switches instead of relays. This cuts the cost a lot and makes it possible to build the switcher on a piece of perfboard or on a PCB. It may also be possible to power it from a 9V battery with this approach, as the major power drain will be the LED's. If you go this route, you can build this thing very economically indeed. Each program slice will cost under $3, making the cost of jacks, an enclosure and a power supply be larger than the programming matrix cost.
The deluxe approach is to use high-reliability rotary switches for selector switches and shielded-core reed relays. If bought new, the high-rel rotaries are about $2.60 each and the shielded reeds are about $5.00 each, for a total of $152.00 (!) for the switches and relays alone. However, if you do this, you get a programmable switcher that should be reliable for years on the road.
The middle-of-the-road way is with surplus parts. You can get rotary switches for $1 or less each (I found 1P10T rotaries for $0.69 each at B.G. Micro) and relays for $0.50 per contact in the surplus market, so this may be your best approach.
There's be more examples and pictures here in the future about building methods.
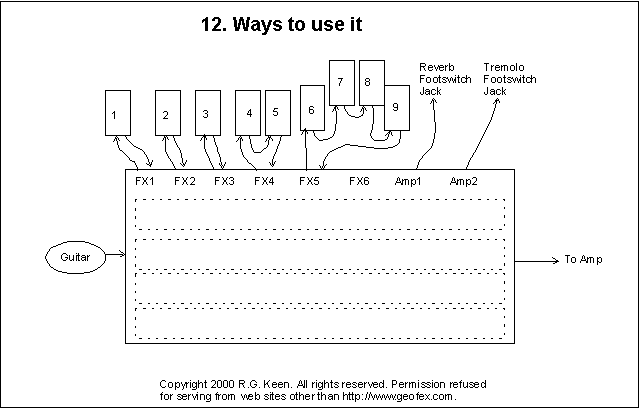
Ways to use it
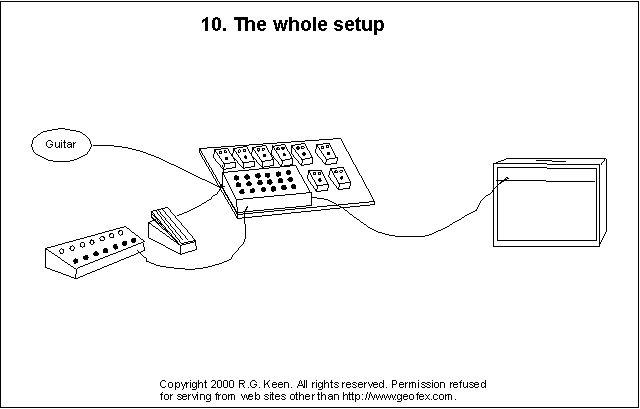
Each "FX" input/output jack pair really amounts to an effect loop. You can plug in one effect or a string of them into each input/output pair, as shown below. You are free to leave one or more FX input/output jacks empty. The jacks will be "normalled" like insert jacks on a mixing board so that if they are both empty the jacks themselves bypass this FX path no matter what the programming matrix says.