An Automatic Mike Muter for Singing Guitarists
Copyright 1999 R.G. Keen. All rights reserved. Fair use only if this notice is reproduced along with any exerpts. No permission for local copies or serving from web servers other than www.eden.com/~keen/.
The average musical Do-It-Yourselfer starts building guitar effects by making a distortion pedal of some sort. It's a good introduction to musical electronics, and pretty simple as well, since getting a circuit NOT to be linear has never been hard. But there comes a time when you have to stop thrashing the strings in your bedroom, get up on stage and *play*. When you get to there, you run into all kinds of little problems that you never encountered back in your room.
If you've crossed the line and play guitar or bass and also sing in a band, you're almost certain to have run into the situation that you step away from the mike to do a solo (or one of those neato, expressive dance steps, or a facial impression of the pain you're pouring out to make these dulcet tones...), and had the mike pick up some unfortunate noise to funnel into the PA. You may even have fumbled for the mike mute switch as you stepped away and back to it, but that's almost terminally clumsy, as you have your hands full of your instrument. Wouldn't it be nice if the microphone was only "listening" when you stepped up to it?
It's easy. Here's how.
Muting a microphone is simple. Knowing when is hard. The real trick is having the microphone be smart enough to figure out that you want to sing now. When my amp-tech friend first asked me to figure out a way to mute a mike when the singer stepped away, I went on these little flights of fancy with infrared motion detectors, ultrasonic range finders and other even less practical stuff, but what finally came out was a cross pollenization idea. Most singer/guitarists stand up to sing (except for you intimate acoustic types!) and that means they touch the floor. The home burglar alarm industry has come up with a simple and durable way to detect people standing on a floor.
There is a burglar detection product that is a laminated plastic film affair with metal strips inside that normally don't touch each other, but anything over about 5 pounds of force causes them to touch. The strips are brought out to leads to sense the contact. These contact mats are normally placed under carpets in places that intruders are likely to step. The pressure sensitive mats are available in two foot by three foot sections for a reasonable price at most burglar alarm suppliers. (Ask to talk to the installation tech, not the sales person!)
You can't just use the mat contacts to open and close the mike lines directly because they would almost certainly cause unendurable hum, buzz and noise pickup. To avoid the noise, you need to use some switch element that is controlled by the mat contacts, but that does not couple the mat noise or clicks to the signal path. It turns out that there are lots of ways to do this, and I'll later describe several ways to do this.
The mechanical setup at the mike itself is as important as the electronics, because it HAS to work properly for the way you use the mike and the way it's set up and transported to and from gigs. The pressure switch mat should be placed on the floor where you'll stand, and a rubber or carpet mat over it to protect the pressure mat from hard edged shoes. There is a small box containing the electronics that is attached to the mike stand in some way. I used velcro strips attached to the box for this. The box needs connectors for the signal cable from the mike, the switched audio cable to the sound board or PA, and a connector for the pressure strip contacts. It's fully possible to build these connections into the mike stand base if you have your own, or to use an external box like I did.
Clearly, there are a thousand ways to do this. You could even do it the Brute Force way, and just put a stomp switch into a box on the floor to punch the mike on and off as you tapdance away and toward the mike stand. However, you have to think about doing things like that, and unless you're a lot more chilled out and together on stage than I am, you'll forget at some crucial moment. The advantage of the smart Mike Muter is that it's automatic. You only have to get yourself to and from the microphone, it takes care of the rest.
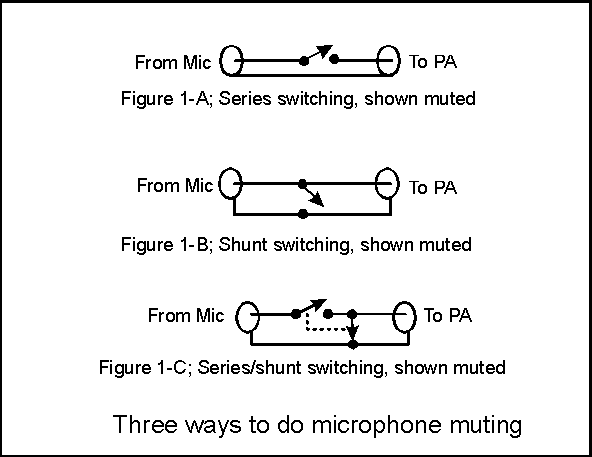
Figure 1 shows several ways to mute a microphone. Note that in this and all the rest of the schematics, two wires do NOT connect where they cross unless there is a dot at the intersection. You can open up the signal line leading to the soundboard/PA by switching in a very high resistance, you can shunt the signal to ground for unbalanced lines or between the signal lines in a balanced system, or you can *both* open the signal line to the microphone *and* shunt the signals to ground on the PA side. By itself, opening the signal line from the mike may not be a good idea, as the open cable leading to the PA may then pick up extraneous noise and hum. Likewise, a shunt arrangement will not leave you with additional hum, but may overload some active mikes by shunting their output to ground. Combined series/shunt switching is the clear way to go. The open line to the mic prevents any overloading of active buffers in capacitor mikes, and provides a high series resistance. The shunt switch ties the PA input to ground, shunting any noise or hum to ground. The low shunt impedance and high series impedance give an even higher attenuation of the mic signal than either series or shunt switching alone.
OK, so for a pro job, we need to use series/shunt switching. What do we use for a switch?
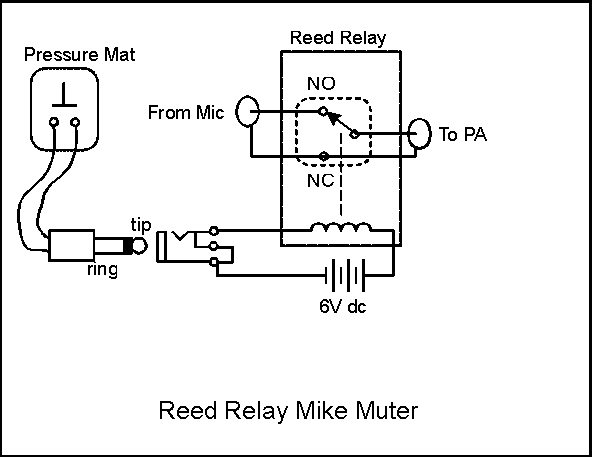
My first prototype used a shielded reed relay. I had some SPDT 5V shielded reeds in my workbench supplies, and one of these worked fine. I used a battery clip for four AA cells, and simply had the pressure mat pull in the relay. The normally open (NO) contact of the reed went to the mic connector, the normally closed (NC) contact went to ground, and the common contact went to the PA connector. The pressure mat contact completed the coil circuit and pulled the relay to its energized state.
After I had this working, I reflected that the shielded reed had cost me over $12.00, and that there had to be a way to keep the costs down for such a simple thing. After messing with lots of switching technologies, I came up with an old favorite - the linear LED/photo-FET optoisolator. The QT Optoelectronics H11F1/F2/F3 series of optos is an incredible secret. You can find the datasheet for this part at QT's web site as http://webserver.qtopto.com/oi/h11fx.pdf if you'd like to see more data. The inside of this thing has a JFET optically coupled to an LED so that when you turn on the LED, the JFET resistance goes down to about 100 ohms. When the LED is off, the resistance is almost unmeasurably high, rated at 100 GIGAohms!. It works with up to 60V of signal, and there is no feedthrough of the LED control signal to the signal path at all, no clicks or pops. A couple of these make an *excellent* series/shunt switch, and they're under US$2.00 each by mail order.
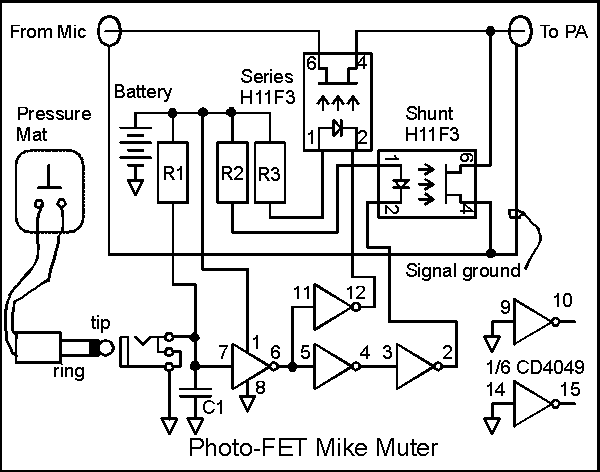
Figure 3 shows the mike muter using two H11F3's. One is arranged in series with the signal from the mic, the other is connected across the signal and ground on the PA side of the first H11F3. The LED's for the two switches have to be driven oppositely - that is, one is on while the other is off. The simplest thing to do this job is a CMOS CD4049 IC. It can be done with transistors, but in one $0.35 chip you get everything you need, and don't have to mess with biasing or calculating resistors. The CD4049 is designed to drive loads up to 48ma, and will work with supply voltages from 3V up to 12V. In this design the 7->6 inverter is used to condition the switch closure of the pressure mat. When the pressure mat is stepped on, it pulls pin 7 of the 4049 to ground, emptying C1 and pulling the end of R1 to ground as well. Any switch bounce is prevented by C1, which will only allow the input of the inverter to rise at a rate determined by the R1-C1 time constant, so C1 holds the input low while the pressure switch bounces, if it does.
With its input low, the output of the 7->6 inverter drives the input of the 5->4 and 11->12 inverters high, so their outputs go low. The output of the 11->12 inverter pulls down on the cathode of the series H11F3's LED at pin 2. Pin 1 of this opto is tied to R3, which limits the current through it to about 16 ma. The LED causes the photoFET in the series H11F3 to conduct, so sound goes through to the PA connector.
Meanwhile, the output of the 5->4 inverter is also low, which causes the output of the 3->2 inverter to be high. This pulls the cathode of the shunt H11F3 module up to the supply voltage. Its anode is pulled up to the battery voltage by R2, and so no current flows, and its photoFET looks like an open circuit; no signal is shunted.
When the pressure mat is unloaded, its contact opens, and C1 charges through R1. When it reaches a bit above 1/2 of the battery voltage, the 7->6 inverter changes state, and all of the rest of the inverters also change state, driven by the 7->6 inverter output. The 11->12 inverter output is high, so the series H11F3 opto goes to the "off" state, letting no signal through to the PA connector. The 3->2 inverter output is low, turning on the LED in the shunt H11F3 and causing its photoFET to go to a low resistance, effectively shorting the PA connector and preventing noise and hum from getting on to the cable. Note that the ground symbol does NOT connect to the signal ground. In fact, nothing about the Mike Muter except the photoFets connect to the signal or signal ground at all. This keeps all the problems with noise at bay.
If you're the kind of guitarist that likes to jump around, you might like the mike not to cut off while you're in the air. If so, you can use a big capacitor and resistor for R1 and C1. If you make the time constant about 2 seconds, you'll get about 1 second of "mike on" after you step off the mat. The turn-on when you step back onto the pressure mat should be almost instant.
So what are the circuit values? R1 and C1 are chosen for the turn-off delay. If you use a ceramic 1uF capacitor for C1, you can get about a 1/2 second delay from a 510K resistor, about one full second from a 1M. The current limiting resistors are chosen for the battery voltage you use. Good choices are four AA cells, giving 6V and long life, or 9V for compatibility with other pedal batteries. The forward voltage of the LED's in the H11Fx series is typically 1.1V, so for a 6V battery, a 270 ohm resistor gives about 16 ma of LED current. If you choose a 9V battery, a 470 ohm resistor will give about the same LED current.
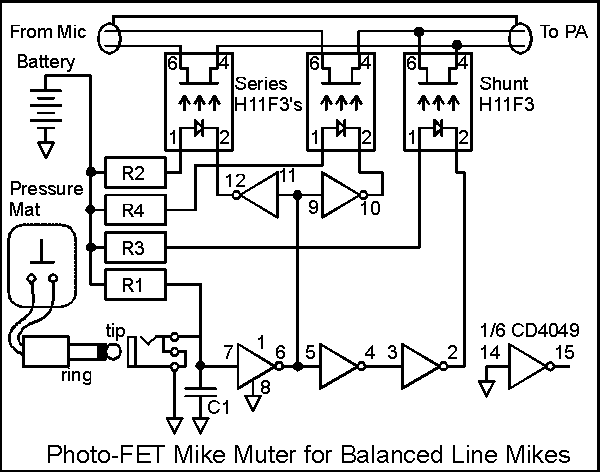
This works fine for single-ended mikes with a shielded cable, but what about pro-quality mikes that use balanced lines and XLR connectors? Take a look at Figure 4, where we adapt the single ended Mike Muter to a balanced line. The only difference is that we now use two H11F3's for the series switch, one in each signal line, and the shunt H11F3 now connects the two signal lines together instead of connecting either one to ground. This version uses another of the unused sections of the CD4049 to drive the extra series H11F3 and another current limiting resistor.
The mechanical assembly on this thing is at least as important as getting it working. As I noted above, the electronics is NOT all there is to this. In any stage activity, you need your tools (guitar, amp, mikes, wiring, etc.) to work the way they work with *you* best. If something is a pain to use, it's no help at all. For the mike muter to work right for you, it has to be easy to set up, and work reliably.
For my prototype, I used a small Hammond aluminum box because they're almost indistructible. I fitted the batteries, connector and circuitry into the box and pop-riveted a couple of velcro strips to the back of the box so I could mount it on any mike stand. For your Mike Muter, I recommend either something similar or building the muter into the base of the mike stand. In either case, you want to:
Let's build one! The reason I was maundering on about the physical setup and connections is that you have to pick that stuff FIRST! The fancy switching electronics is only a minor part of what goes into the box. Decide on what battery you'll be using, and accurately measure the size of the overall battery plus clip. Pick out your mike and pressure switch connectors. If you have the unbalanced 1/4" phone plug style mike lines, use Switchcraft enclosed 1/4" jacks for the signal connectors and a 1/8" closed circuit jack for the pressure mat. If you have the XLR style balanced line mikes, use Switchcraft three pin balanced connectors. These things are not tiny, so you'll need to account for them in the box.
Once you have the parts you'll be putting in the box, do a trial layout on a piece of paper. Sketch out where the mike connector, PA connector and pressure mat connector go in the box, and how you'll attach it to the mike stand. Do you want the mike and PA connectors on the same side of the box, or at opposite ends? Pressure mat connector out the same side as an audio connection or a different side altogether?
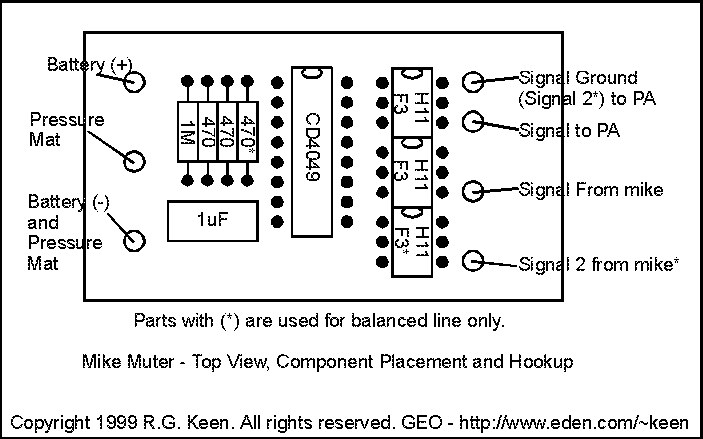
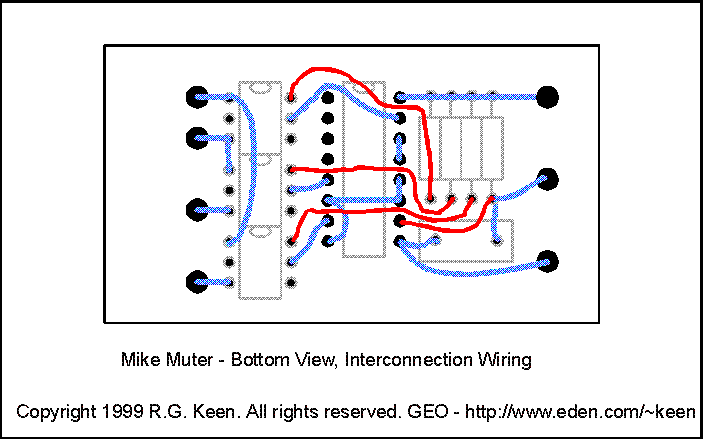
Ready to start soldering? OK, here's a picture of a good way to place parts in perf board to build it and a picture of the interconnection wiring on the bottom of the perfboard.
Parts List