There are a number of reasons that stomp switches are
special. That's part of what makes them so expensive. They have to
- Be sturdy enough to literally stomp on
- Operate a switch that works properly on tiny signals ( called a
"dry circuit" in techie jargon)
- Protect that switch from the stomp: have a limited travel that
actuates the signal switch but does not destroy it.
As effects hackers we like to add to that - be cheap!
I was browsing through Home Depot and I chanced on the display that
has parts for repairing lamps. It suddenly struck me that there was
enough parts there to make an actuator.
Here's how.
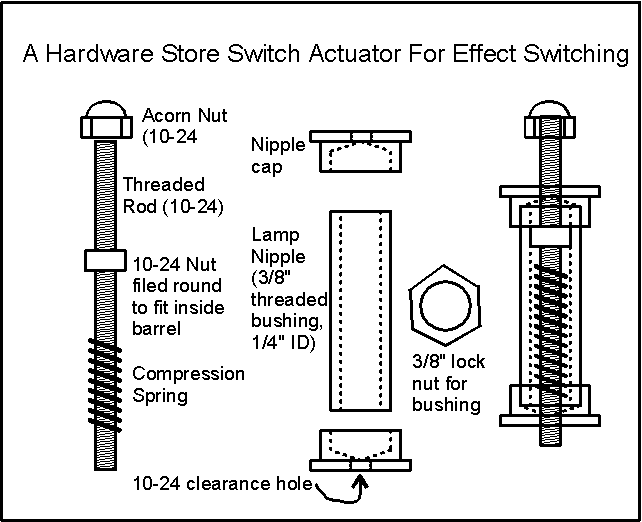
 The
key to the whole thing is what is called a "lamp nipple". This
is a threaded bushing that's a nominal 3/8" (0.375") outer
diameter and 1/4" (0.250") inside diameter, with threads on
the outside. In the picture I've left off the threads on the outside of
the bushing for clarity; they're really there. The
key to the whole thing is what is called a "lamp nipple". This
is a threaded bushing that's a nominal 3/8" (0.375") outer
diameter and 1/4" (0.250") inside diameter, with threads on
the outside. In the picture I've left off the threads on the outside of
the bushing for clarity; they're really there.
There are lock nuts that fit the threaded bushing that will let you
drill a 3/8" hole in a box and tighten the lock nuts to hold the
bushing in the box.
There are also end caps that screw onto the ends of the bushing.
These have been machined with a neat center depression inside that will
center up your drill bit so you can drill a clearance hole for 10-24
threaded rod (that's #10 hardware sized, 24 threads per inch)
Here is some detail on how to make the actuator from parts you can
buy in Home Depot.
1. Decide how much plunger travel you need.
2. Get a compression spring that fits easily over the 10-24 threaded rod and inside the barrel. Cut off enough
to allow at least the plunger travel you need from 1.
3. Add the plunger travel to the fully-compressed spring length and to the thickness of a 10-24 nut. This is the
minimum length of the barrel. Make it a bit (maybe 0.050") longer just for grins.
4. Cut off the barrel to this length and file the cut end(s) smooth.
5. Center drill two of the threaded caps with a 10-24 clearance hole so the threaded rod slides easily though
the center of them.
6. file a 10-24 nut round and small enough to fit inside the barrel. This is the stop on the 10/24 rod.
7. Screw the caps on both ends of the barrel, and screw one of the rounded-end 10-24 cap nuts fully onto the
10-24 threaded rod. Stick the threaded rod through the double-capped barrel until the cap nut fits completely
against one cap.
8. Measure and mark the 10-24 rod length on the end protruding through the other cap a distance greater than
the travel of the plunger.
9. Remove the cap nut, cut the threaded rod at this mark and file the cut end smooth.
10. Unscrew one cap from the barrel. Drop in the compression spring. Screw the filed-round nut onto the
threaded rod and drop the threaded rod into the open end of the barrel. Adjust the rounded nut until the end of
the threaded rod sticks out the spring/bottom end.
11. place the top cap over the threaded rod end and screw it down onto the barrel. The threaded rod now
should be spring loaded one way. Screw the cap nut onto the top end of the threaded rod. You should now
have a working spring loaded actuator.
12. adjust the location of the internal filed-round 10-24 nut until the action and travel is correct. When you find
that position, unscrew the top cap from the barrel and superglue the filed-round nut into place.
You now have a working actuator.
13. Measure the cut length of the barrel, threaded rod, cut spring, and the position of the filed-round nut on the
threaded rod. You can now make more without the awkward series of steps - just measure, cut and file.
The bottom end can be connected to the device it actuates by something like a fountain pen spring, or a pad of
fairly dense foam rubber for some compliance.
You can actuate
- small tactile switches ala the TS-9
- leaf switches
- reed switches by moving either a magnet or an iron shield
- smaller and more fragile but still-good-for-signal-use DPDT's
I personally try to concentrate on things that do not involve
precision spacing of the PCB from the box, just to make the mechanical
setup easier, but hey, you may be better at that than I am.
The plunger setup is physically robust, and its travel is limited, so you can stomp all you like.
You can cast a bigger and more interesting button on top of the cap nut if you like, or use anything that threads
to the top of the 10-24 rod.
As always, comments and corrections gratefully accepted!
|
 The
key to the whole thing is what is called a "lamp nipple". This
is a threaded bushing that's a nominal 3/8" (0.375") outer
diameter and 1/4" (0.250") inside diameter, with threads on
the outside. In the picture I've left off the threads on the outside of
the bushing for clarity; they're really there.