Digital Generation of LFO's for Modulating Effects
Copyright 2000 R.G. Keen. All rights reserved. No permission
for local copies or serving from web sites other than http://www.geofex.com.
[PseudoRandom LFO]
[Star Stepped LFO] [Other Digital LFO Waveforms]
[An Analog Sequenced LFO] [Connecting the
LFO's up to Effects]
Modulated effects are pretty neat, but after you've been around
a phaser or flanger swooshing repeatedly back and forth for a long time, you get
fairly bored with the predictability of the effect. To liven things up a bit,
add a little unpredictability to modulated effects with a pseudorandom modulation.
Paraphrasing Dr. Hook and the Medicine Show "pseudorandom?
Oh, wow, man... what's that??". "Pseudo" means something like
"looks like but isn't the real thing". So a pseudorandom signal looks
like - but isn't exactly - a random signal. It turns out that real random
signals are very, very hard to produce reliably. Fortunately, you don't have to
make things perfectly random to be pleasing to people; in fact, some regularity
is quite pleasing, as long as there is some variability in it.
There are some logical counter techniques that can product very
convincing simulations of real random signals. The so-called "maximum
length sequence" counters do a pretty good job of this. However, they're a
bit too complicated and even too random for most musical uses. A simpler, and
perhaps more pleasing pseudorandom generator can be made simply from several
square wave oscillators.
One square wave oscillator isn't random at all - it just bangs
back and forth regularly. If we take a second oscillator running at a very
slightly different frequency, we get the classical "beating" between
the two. This is familiar to every guitarist who hears beats between notes as he
tunes up his axe. Still very predictable, though. Adding a third oscillator
starts to mix things up, though. Now there are two beats wandering around as
well as the original oscillator frequencies. This has an amount of randomness
about like ocean waves, and a three-oscillator LFO was actually used for a
surf-sound synthesizer by PAIA in one of their kits. A fourth oscillator takes
you over the cliff to pretty darn unpredictable in the short run, but with some
recognizable similarities over long times.
Pseudorandom LFO
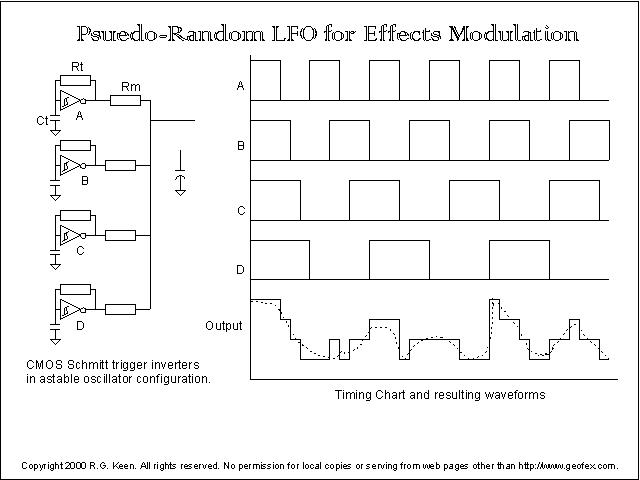 A very quick
and easy way to make a multiple oscillator pseudorandom LFO is shown in the
illustration. Schmitt trigger CMOS inverters like the CD40106, CD 4584, and
others make easy oscillators. They have hysteresis, so if you feed a capacitor
from their output through a resistor and connect their input to the
capacitor/resistor junction, the gate alternately charges and discharges the
capacitor, providing a square wave on the inverter's output.
A very quick
and easy way to make a multiple oscillator pseudorandom LFO is shown in the
illustration. Schmitt trigger CMOS inverters like the CD40106, CD 4584, and
others make easy oscillators. They have hysteresis, so if you feed a capacitor
from their output through a resistor and connect their input to the
capacitor/resistor junction, the gate alternately charges and discharges the
capacitor, providing a square wave on the inverter's output.
The timing chart shows how the randomness works. I've shown four
oscillators, mixed with four resistors.
When the power is turned on to the chip, all the capacitor are
at 0V, so the outputs are all high. The capacitor voltage ramps up through the
feedback resistor, Rt. Since all the oscillator outputs are high, the output is
as high as it can go (usually the power supply voltage). When the fastest
oscillator, A in this case, flips to its most negative state, it pulls the
output down a bit, but the other three hold it up to about 3/4 of the max value.
When the second oscillator changes state, the output drops another step.
What's most interesting is that as the oscillators run, they go
through all possible reinforcing and interfering states. I've plotted out some
possible results in the illustration. The output comes out as a kind of drunken,
staggering stairstep waveform. If you connect a smoothing capacitor to the
output, it smooths the rough edges off the stairsteps, and the output becomes a
smooth, but still staggering wave like the dotted line.
Both the stairstep and smoothed version are useful. A filter
like a wah modified to be controlled by an external signal (See "The
Technology of Wah Pedals") would leap from one resonance point to the next
in a not-very predictable way if controlled by the drunken stairstep. It would
swoop around unpredictably if fed by the smoothed version.
Notice that while the output waveform does occasionally get as
large as the full supply voltage and as small as 0V, that it spends most of its
time near the middle of the power supply. In applying this LFO, you may need to
adjust the DC level up or down to suit the element of the circuit that you are
controlling. A resistor to ground will lower the peak voltage from Vsupply down
to Vsupply* (R|| / Rpulldown) where R|| is the parallel combination of all the
mixing resistors Rm, and Rpulldown is the added resistor. A resistor to a
decoupled Vbias in the middle of the power supply will simply reduce the peak to
peak size of the LFO waveform, but leave its average level the same. A resistor
to the positive supply will make the LFO output a maximum of the supply voltage,
but will reduce the peak to peak size in the same way the pull down resistor
did, so the variation will all be smaller and near the power supply voltage.
Regular Stair Step LFO
 For
non-random LFO waveforms, we need a non-random way to generate them. A really
handy way to do this is with a walking ring counter. Figure 1 at the right shows
one way to do this.
For
non-random LFO waveforms, we need a non-random way to generate them. A really
handy way to do this is with a walking ring counter. Figure 1 at the right shows
one way to do this.
The counter is a series of D-type
flipflops all clocked by a common clock. A "D" flipflop accepts
whatever logic level is present at its D (for "data") input when the
clock ticks and latches that into its "Q" output. With a string of
these things, the logic level that appears at the D input of the first flipflop
will be passed down the line, one flipflop per clock tick.
What
makes it a "walking ring" is that the output of flipflop E is inverted
and fed back to the D input of flipflop A..
When the
power is first turned on, before the first clock tick, we'll assume that the
flops are all sitting at "0". That means that the inverter has a 0 on
its input from the output of E, and is presenting a 1 to the D input of flipflop
A..
On the first clock tick, the 1 on the first D input is
transferred to the Q of the first stage. All of the other flipflops saw a 0 on
their D inputs, so they clocked in a 0 - effectively no change. The inverter
still sees a 0, so it still puts a 1 on the first D input. On the second clock
tick, The first stage clocks in another 1, but the second stage now clocks in
the 1 from the first flipflop's Q output. The remaining three flipflops still
clock in a 0.
On each clock tick, a 1 is clocked into the first
flipflop, and the chain of flipflops fills up with 1 logic levels from the left.
This keeps happening until the last flipflop gets a 1 clocked into its output.
At that point the inverter puts a 0 on the D input of the first flipflop.
A
string of five ones has been clocked into the counter. When the counter fills
with ones, it then fills with 0s. This series of counting will continue forever,
with the counter filling alternately with 1's and then 0's.
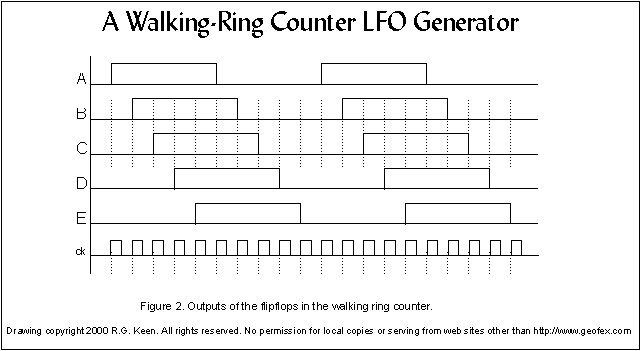 What makes
this useful is that we can use the overlapping nature of the outputs to
generate waveforms. Figure 2 shows how this works. With each clock tick, the
"bundle" of ones and 0's rotates through the set of flipflops. If
we look at all the outputs simultaneously, the set of 0's and ones at each
successive clock tick looks like:
What makes
this useful is that we can use the overlapping nature of the outputs to
generate waveforms. Figure 2 shows how this works. With each clock tick, the
"bundle" of ones and 0's rotates through the set of flipflops. If
we look at all the outputs simultaneously, the set of 0's and ones at each
successive clock tick looks like:
ABCDE
00000
10000
11000
11100
11110
11111
01111
00111
00011
00001
00000
If we then consider these "1's" and "0's" as analog
voltages, we can use resistors to add them up and make different waveforms
from them.
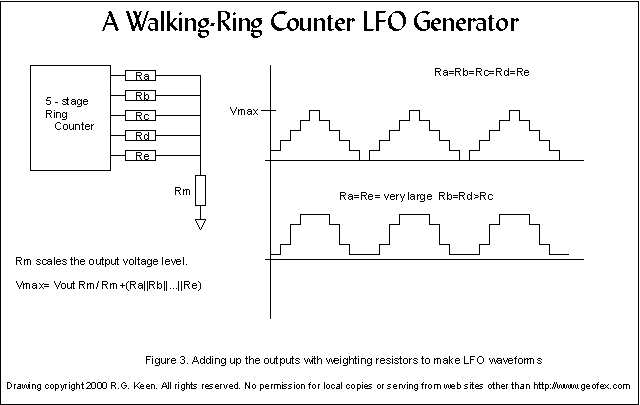 The
simplest thing to do is a stairstep. As we see in figure 3, we can put an equal
resistor in series with each one, and tie all of those to a "mixing
resistor" Rm. With all of the outputs at 0, the voltage across Rm is also
0. With one of the outputs at 1, the voltage across Rm is just determined by the
resistive voltage divider formed; one resistor is effectively connected to the
supply voltage (with CMOS logic, anyway) and the second resistor is Rm in
parallel with all the other output resistors, as they're all held at 0 as well.
Two outputs high gives a next step up, and so on until all the outputs are high,
giving the maximum output for the waveform. For the five stage ring counter
we've been using for an example, you get the neatly stepped waveform shown at
the top.
The
simplest thing to do is a stairstep. As we see in figure 3, we can put an equal
resistor in series with each one, and tie all of those to a "mixing
resistor" Rm. With all of the outputs at 0, the voltage across Rm is also
0. With one of the outputs at 1, the voltage across Rm is just determined by the
resistive voltage divider formed; one resistor is effectively connected to the
supply voltage (with CMOS logic, anyway) and the second resistor is Rm in
parallel with all the other output resistors, as they're all held at 0 as well.
Two outputs high gives a next step up, and so on until all the outputs are high,
giving the maximum output for the waveform. For the five stage ring counter
we've been using for an example, you get the neatly stepped waveform shown at
the top.
Other Digitally
Generated LFO's
But the
resistors don't all have to be equal, do they? In fact, you can make a pretty
good sine wave by making the "middle" resistor smaller than the
others, and having the values of the resistors calculated to make the closest
approximation of a sine wave at the time the clock ticks. The second waveform
shows how this can be done. The non-uniform steps make an ugly approximation to
a sine wave. If you are careful about selecting the resistor values and filter
the output with even a simple capacitor, the approximations start to look VERY
much like a sine wave. With a large number of stages in the walking ring
counter, you can approximate a sine wave to any degree you'd like.
More
on digital sine waves in a later update!
Implementing the CMOS
Walking Ring Counter
"But..." I can hear you asking, "isn't all that
digital stuff complicated to do and hard to put into effects?"
Maybe. Maybe not. The trick here is that a whole digital walking
ring LFO circuit can be done with only two CMOS chips of the US$0.30 variety.
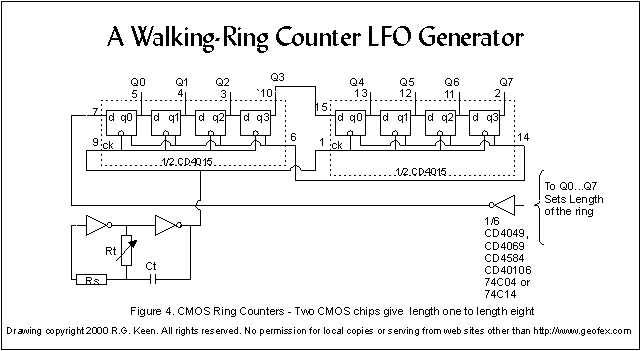 Figure 4 shows
one way. With the CD4015 dual four-bit shift register and one hex inverter chip,
you get a walking ring counter of lengths one to eight. The length of the
walking ring is really determined by where you take the feedback from. If you
string the two halves of the CD4015 together for a length-eight shift register,
you only need to connect an inverter input to one of the outputs and feed the
inverter to the D input on the first shift register. If you tie it to Q3, then
Q0...Q3 form a length-four chain. If you tie it to Q6, you get a length-seven
chain.
Figure 4 shows
one way. With the CD4015 dual four-bit shift register and one hex inverter chip,
you get a walking ring counter of lengths one to eight. The length of the
walking ring is really determined by where you take the feedback from. If you
string the two halves of the CD4015 together for a length-eight shift register,
you only need to connect an inverter input to one of the outputs and feed the
inverter to the D input on the first shift register. If you tie it to Q3, then
Q0...Q3 form a length-four chain. If you tie it to Q6, you get a length-seven
chain.
The necessary inverter to make the ring count and the variable
speed clock to make the whole mess run only take 1/2 of a hex inverter.
This being digital, you know very exactly what will happen and
when. You can play tricks with the ring counter to do other things as well:
If you tie the "reset" inputs to Q7, the ring will
walk a one up through Q6 (seven steps, that is, since Q0 is the first one) and
the instant that Q7 gets clocked to a 1, it resets the chip to all 0's. This
happens so fast that you can't see it on a normal oscilloscope. If you connect
up equally weighted mixing resistors, it looks like a stairstep up for seven
steps, then a sudden fall back to 0. It's a stepped sawtooth wave, in other
words. You may like the steps in things like a stepped LFO, or you could smooth
it out to a psuedo-linear sawtooth.
Why bother with all this? Can't I just do a LFO with opamps?
Sure you can. However, you rapidly run into some limitations. Opamp waveform
generators that operate over wide ranges of frequency and hold tight control of
DC levels and symmetry are tricky to do. They don't offer the option of the
stairstepped waveforms at all - only the smoothly varying ones. A pulse
oscillator like that needed for the clock of these things can have a much wider
frequency range and still run the counters just fine, as well as operating at
higher frequencies, so large timing caps are not needed. Not only that, but
we'll get into some things that are difficult if not impossible to do with a
reasonable amount of opamps. Here's one that you can't do with opamps, at least
not very easily.
An Analog Sequenced LFO
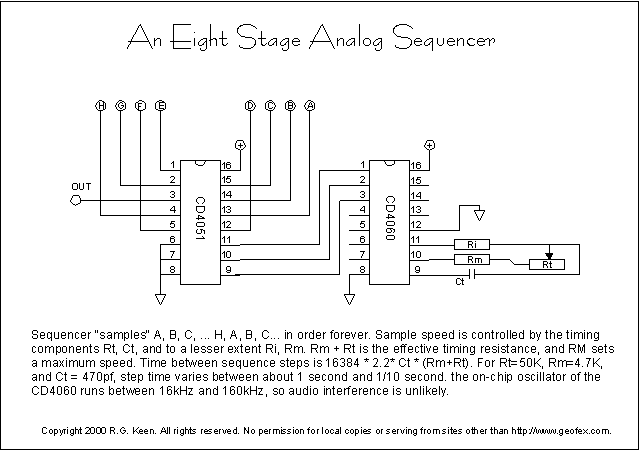 The picture at
the right offers an eight stage stepped LFO that can be any voltage at any given
time. Let's look at how this works.
The picture at
the right offers an eight stage stepped LFO that can be any voltage at any given
time. Let's look at how this works.
The CD4060 is a CMOS 14-stage binary counter with an internal
oscillator on chip. The oscillator is controlled by the resistors and capacitor
tied to the timing pins, 9-11. This oscillator runs the binary counter, and the
various outputs count at the oscillator speed. In particular, pins 1, 2, and 3
count at 1/16384 th of the oscillator frequency.
If we set the main oscillator to run from 16384 Hz to 163840Hz,
then outputs 1,2 and 3 count at from 1 Hz to 10 Hz.
The outputs at pins 1-3 are supplied to the selector inputs of
the CD4051. The 4051 is a one-of-eight analog selector switch. This is like a
single pole, eight throw switch that connects one of eight positions to a single
output pin. As the counting inputs change, input A, B, C, ... H are selected in
turn and connected to the output on pin 3. Once H is reached, the cycle starts
over at A.
The inputs to the selector chip can be any voltage within the
range of the chip's positive supply pin (shown as a plus sign with a circle
around it) to its most negative supply pin, shown as ground. We could
connect eight potentiometers to those inputs, with the potentiometers strung
between the + supply and ground. If we did that, we could adjust the voltage for
each step independently, and the sequencer would select each of those in turn.
The LFO output could be any of eight different values, depending only on the
settings of the eight pots. There is a commercial device that does a similar
operation, although I have no idea if it's implemented in the same way.
This task would be almost impossible to do with any reasonable
number of opamps.
Driving Effects Circuits with the LFO Waveforms
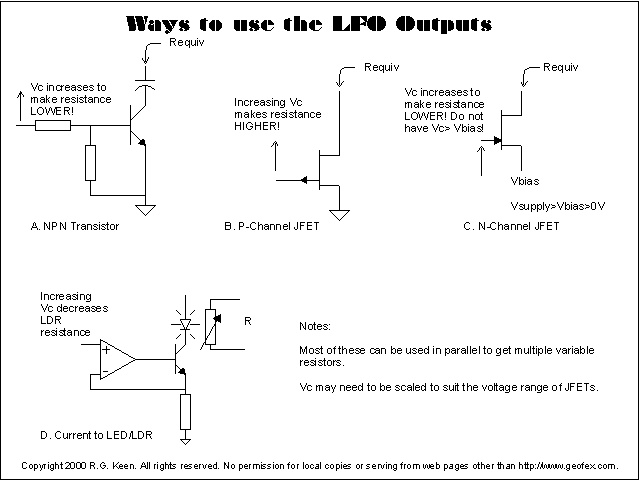 OK, looks good, we can get some fancy modulating waveforms. How
do we hook them up to effects?
OK, looks good, we can get some fancy modulating waveforms. How
do we hook them up to effects?
The simplest thing to do is to use either a bipolar (normal)
transistor or a JFET as a variable resistor that does the actual effect
modulating. This is illustrated at right.
In A. an increasing control voltage (Vc) makes the NPN
transistor turn on more. For small voltages at its collector and small base
currents, this acts like a variable resistor. This is the variable resistor
technique actually used in effects like the Seamoon Funk Machine, EH Dr. Q, and
the EH Pulsar tremolo. The trick here is to make the base current very low by
making the resistance in series with the base very large. For our digitally
generated LFO waveforms, the output voltage may be as low as 0V and as high as
the full power supply voltage.
To control the NPN transistor, all we need to do is to note that
the transistor really doesn't care what voltage is there, it only cares about
the current into its base. We can simply make the Rm mixing resistors be large,
maybe 100K and up, and the resistors themselves make an effective "current
source" into the NPN transistor's base. If the transistor's collector
resistance is connected directly to the signal lines, we need to do some
housekeeping to keep things nice. A big electrolytic capacitor as shown will
keep the inherent offset voltage of the bipolar transistor from being
transmitted into the circuit; likewise, we probably want a capacitor of some
kind from the base to emitter to slow down the very fast jumps of voltage that
digital LFO's feed to the transistor base. The transistor is, after all, still
an amplifier, and it will amplify those steps as well! Slow it down a bit.
With mixing resistors in the 100K and up class and a 2N5088,
circuit A can be used to operate the Seamoon and Dr. Q. wah filters, and the
single-resistor-to-ground wahs as noted in The Technology of Wah Pedals here at
GEO.
Another way to get a variable resistor to ground is shown in B.
A P-channel JFET acts like a variable resistor when its gate is more positive
than its source. We've shown the source grounded, and the Vc control voltage
applied to the gate. Since Vc from our digital LFO's can go from ground to some
positive voltage easily, this connection is also a natural. Most JFET do not
need a range of 0V to 9V of Vgs to go from fully on to fully off, so in
this case, we will likely need a pulldown resistor to decrease the size of the
LFO output and make sure it never goes more negative than ground. A P-Channel
JFET is fully on when its gate is the same voltage as its source, and has a
higher and higher resistance as its gate gets more positive; this is the reverse
of the NPN transistor, so a larger Vc turns a P-channel JFET more OFF (higher
resistance) while a larger Vc turns an NPN transistor more ON (lower
resistance).
An N-channel JFET is also a good variable resistor, and that is
what is used in many effects circuits. It gets a bit trickier though, because an
N-channel JFET wants its gate to go more negative than its source to make it
higher resistance. So we have to pin its source to some intermediate DC votlage
like a Vbias source, and then vary the gate voltage lower than that. Again, we
probably want a pull-down resistor, but we need to diddle the value to get the
peaks of the LFO waveform to hit Vgs=0 (fully on) and to go negative enough to
make the JFET a high enough resistance.